Hey guys! Here is a fun and super simple nail tutorial for you. I used to do this to my nails at least once a week. It's really creative and cute, so I hope you enjoy it.
Showing posts with label nail art. Show all posts
Showing posts with label nail art. Show all posts
Friday, April 7, 2017
Monday, December 21, 2015
How to: Santa Hat Nail Art

Christmas is around the corner and what better way to get into the holiday spirit than a simple Santa Hat DIY tutorial! Honestly, this tutorial is so easy that you will be rocking this cute look way after the holidays are over. Watch the video below to see the tutorial!
Thanks for watching and don't forget to subscribe to my blog and YouTube channel!
Stay connected & follow me on Instagram!
Wednesday, December 31, 2014
Santa Hat Nail Art

Want to jazz up your nails for the holidays? Today's video post will teach you how easy it is to create Santa Hat nail art. See the link below to learn the steps needed to Santa Hat nail art.
Tuesday, September 2, 2014
DIY Black And White Nail Art

Doing fun nail art designs is not always as difficult as it may look. In today's post I will show you how to create a black and white stripe pattern on your nails. Below are step-by-step instructions of how to recreate the desired effect on your nails.
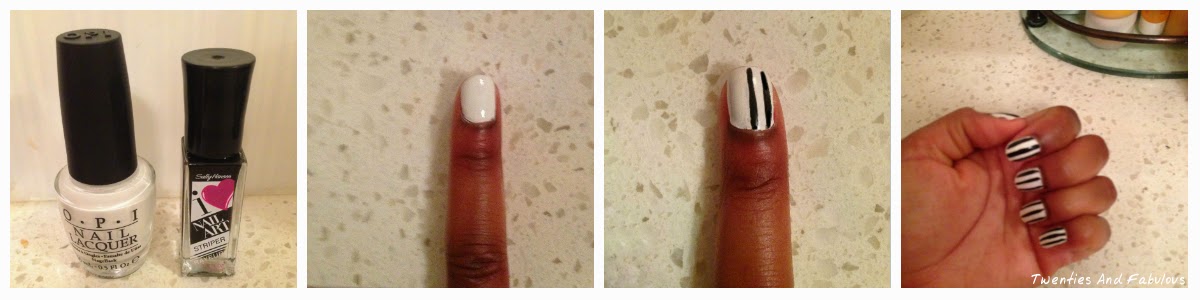
Step 1: To create this design you will need white nail polish and a black nail polish striper. Although you can use any white nail polish brand you have available, I used a white nail polish by OPI called Alpine Snow and a black nail art striper by Sally Hansen.

Step 2: Begin by painting your nails a solid colour of white. This will be the background for your white stripe. As white nail polish sometimes appears chalky on nails, you may have to do two coats to create the desired look. Keep in mind that you don't have to paint all of your nails white, but the nails ones you want to have the design on. In my case I choose to paint all of my nails in white nail polish to create the stripe look.

Step 3: Once the white nail polish has dried, take the black nail art striper and apply a straight line down the center of your nail. Once the first line is done you can begin to paint the other lines that will be placed on either side of the centre line as shown below. Follow this patten for all of the nails you have painted in white nail polish. *Don't worry if it is not entirely straight as the effect will still show properly when all stripes have been applied.

Step 4: When your nails are done, you should see a black and white stripe design similar to the image shown below. After your nails have dried, add a top coat to give your nails some added shine and help the polish last longer. You don't want your nails to chip after you took time to create this fun nail art design.

Overall, I this post has shown you how easy it is to create fun nail art designs that you can do yourself! If you want to learn how to do other designs or enjoyed this post feel free to leave a comment below.
Tuesday, April 15, 2014
DIY: POLKA DOT NAIL ART

Doing your own nail art may seem daunting, but with practice and some basic tools you can create your own nail design. In order to create this polka dot design you will need the following items: (1) A nail polish that will be used as your base/main colour. I chose to go with a bright orange color by Essie called Saturday Disco Fever, but you can choose a different color if you would like. (2) You need another nail polish that you will use to create the polka dots on your nails. I decided to go with a white polish I have by OPI called Alpine Snow, but again you can use any color you prefer. Remember: It's important to choose two contrasting colors in order for the nail art to stand out. The worst thing would be to have a nail design that blends in. Lastly, you need a tool to create the polka dots that will be used as the design on your nails. For this you can use a nail dotting tool, such as the one I am using in the picture below. If you don't have any nail dotting tools, you can use a tooth pick or dried up ballpoint pen to create the dots. Tip: When doing nail art, try to be resourceful since many of the tools people use to create nail art can be created with everyday household items.
Once you have gathered all of the items needed you are ready to create your polka dot nail art!
Below is a step-by-step process on how to create this look:

Step 1: Paint your nails with your main base coat. Do two coats depending on how you want your nail polish to look.
Step 2: Once your nail polish has dried, take your nail dotting tool/toothpick and dip it into your contrasting color. I choose to go with white (Alpine Snow by OPI) in order for it to pop against the orange (Saturday Disco Fever by Essie).

Step 3: You can place any many dots on your nail as you want. You can put dots on every nail if you want, or on only a few nails. It's really up to you. I chose to do a few nails with the polka dots design, because the white dots are very loud on my nails and I did not want to make my fingers too distracting. Once you have followed these steps you have made your own DIY polka dot nail art. Simple and easy!

I hope you enjoyed this post and feel inspired to do your own nail art!
Don't forget to Follow my blog with Bloglovin
Subscribe to:
Comments (Atom)